

Welcome to the first 2018-2019 FSJ Creative Team Blog Hop!
I am absolutely thrilled to be a member of this very talented team of designers. This team will bring you fun and inspiring projects every month by using some of the amazing and colorful products from FSJ! Today I will be showcasing the Martha's Pumpkins Bundle. But, before I dive into that, please check out the list of blog hoppers below and be sure to visit each and every one. I think you will totally enjoy the creativity and talent that these ladies have to share! Kazan Clark Lezlye Lauterbach Carrie Rhoades Christine Chan Jill Hilliard Jenny Watson (you are here) Marty McGee Alissa Hall Oh, and just in case you get lost along the way, the official blog list is also posted on the Fun Stampers Journey blog - you can see that list HERE.
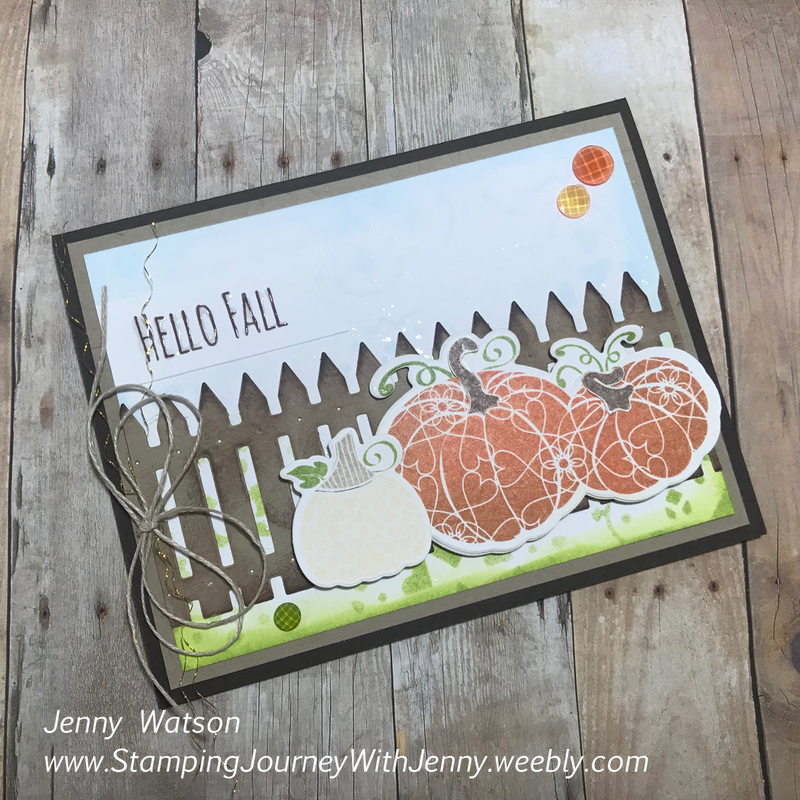
Today I will be showcasing a new bundle from the Journey Holidays Trends Mini Catalog. The minute I saw Martha's Pumpkins debuted at the Fun Stampers Journey convention in June, I knew it would be the first set I would purchase from the new Journey Holidays Mini. I love everything about the set - it's very versatile in that it can be used for fall, Halloween and Thanksgiving.....AND it has a matching die set! Please enjoy my Martha's Pumpkin Trio as I demonstrate fun and easy ways to utilize this bundle for fall, Halloween and Thanksgiving.
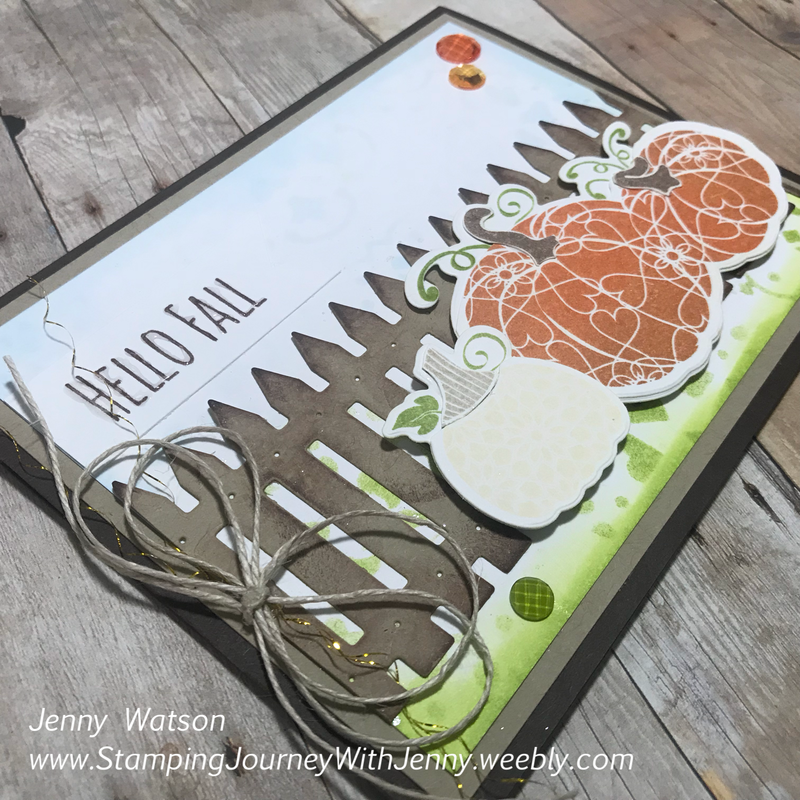
Fall Card

Supplies
STAMPS, DIES & EMBOSSING FOLDERS
Martha's Pumpkins BD-0426, Garden Fence DI-0485, Hello Fall SS-0450 PAPER Whip Cream CS-0040, Oatmeal Cookie CS-0023, Cocoa Powder CS-0008 INK/COLORING Cocoa Powder IP-0016, Oatmeal Cookie IP-0011, Banana Cream IP-0046, Tangerine Fusion IP-0005, Lemongrass IP-0022, Lovely Blue IP-0075 EMBELLISHMENTS Journey Glaze AD-0003, Natural Journey Twine AC-0005, Rainbow Drops AC-0178, Gift Twine AC-0395, Sparkle Silk IP-0126 ADHESIVES Easy Glide Permanent Adhesive Runner AD-0081, Foam Squares AD-0084 & AD-0085, Craft Glue AD-0111, White Liner Tape AD-0001, Glue Dots AD-0083 TOOLS Bloom Tool TO-0073, Journey Blooms Paper Trimmer TO-0039, Details Pro Shears TO-0063, FSJ Platinum 6 TO-0153, Journey Scoring Board TO-0149, Large Dauber Dowel TO-0138, Small Dauber Dowel TO-0137, Cement Tile Stencil JM-0118 Measurements
Cocoa Powder Card Stock
- card base 5-1/2" x 8-1/2" Whip Cream Card Stock - front panel 3-3/4" x 5" - piece to die cut pumpkins 5-1/2" x 8-1/2" - piece to stamp sentiment 3/4" x 2-1/2" Oatmeal Cookie Card Stock - layered panel 4" x 5-1/4" - piece to die cut fence 2-1/2" x 6" Instructions
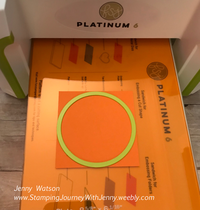
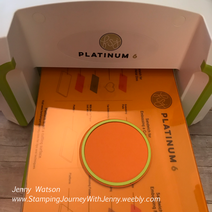
This is a really fun card to create - it utilizes a paper piecing technique to create the different colors on the pumpkins. To begin, stamp the smallest pumpkin in the set in Banana Cream, Oatmeal Cookie and Lemongrass ink on Whip Cream card stock. Stamp the double pumpkin stamp in Cocoa Powder, Tangerine Fusion and Lemongrass ink on Whip Cream card stock. Die cut all the stamped images using the FSJ Platinum 6 machine and the matching die set.
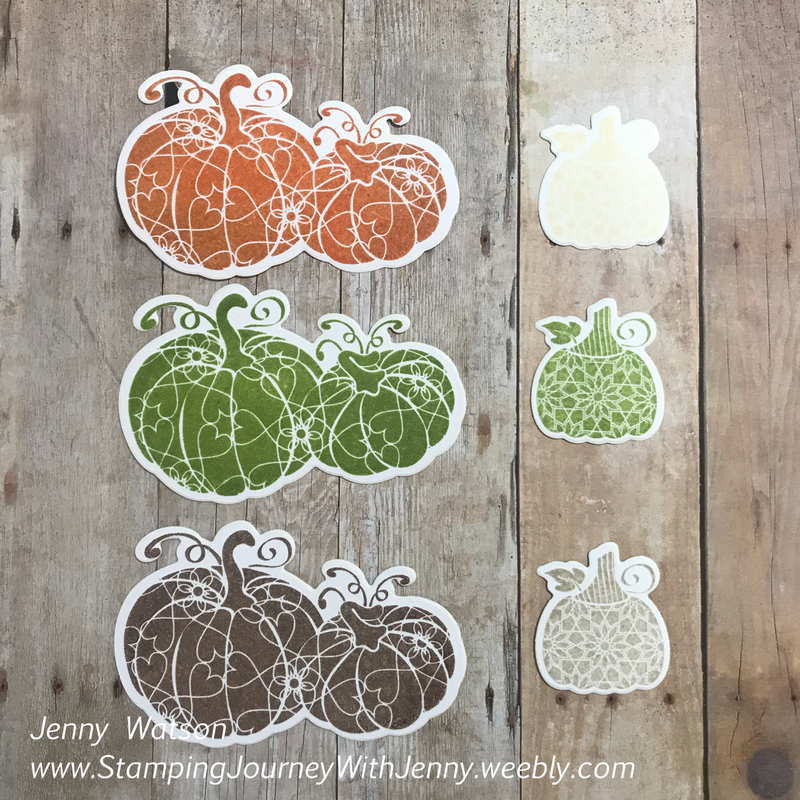
It is easiest to cut the pumpkins and stems, so the Lemongrass pumpkin die cuts will be the base. Using your Details Pro Shears, cut the stems out of the Oatmeal Cookie and Cocoa Powder die cuts. Then, cut the pumpkins out of the Tangerine Fusion and Banana Cream images. Using Journey Craft Glue, adhere the pumpkins and stems to the Lemongrass die cuts to create the tri-colored pumpkin images.

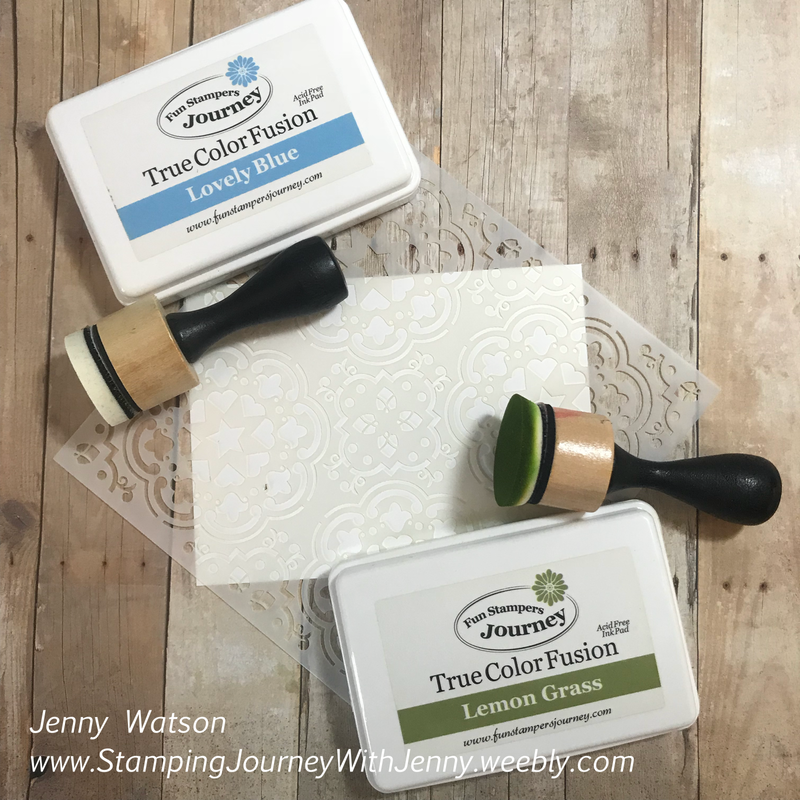
Using the FSJ Platinum 6, Garden Fence die and Oatmeal Cookie card stock, die cut the fence and add Cocoa Powder ink with the Small Dauber. Using the Large Dauber, Cement Tile Stencil, Lovely Blue and Lemongrass ink, create the background on the Whip Cream card stock. Add extra ink from the dauber along the edges of the card stock. Add Sparkle Silk to the stenciled panel.
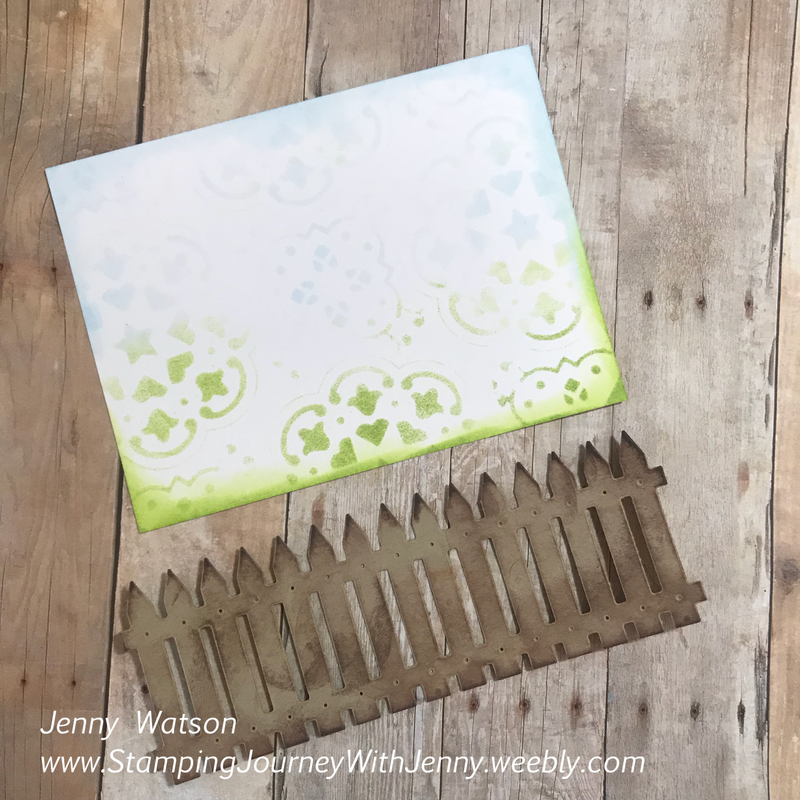
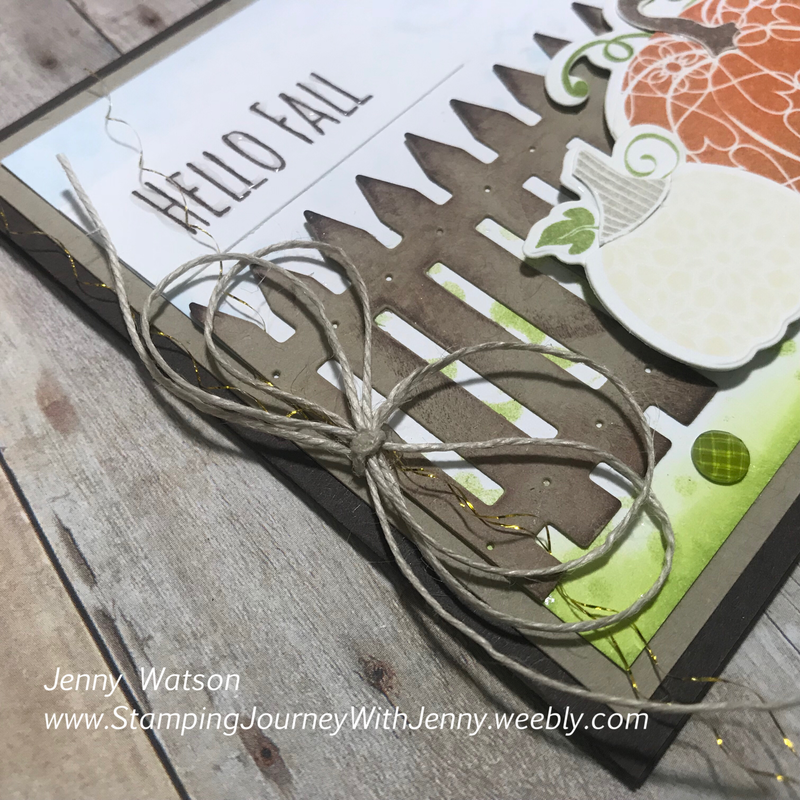
Adhere the fence to the stenciled panel and trim edges as needed. Using the Journey Scoring Board, score and fold the Cocoa Powder card stock base. Adhere the Oatmeal Cookie panel the Cocoa Powder and the Whip Cream Stenciled panel to the Oatmeal Cookie. Stamp the 'Hello Fall' sentiment on the 3/4" x 2-1/2" Whip Cream card stock using Cocoa Powder ink. Cut the right side into a banner shape using your Details Pro Shears. Adhere just above the fence on the left side. Adhere the pumpkins using Journey Foam Squares on the bottom right of the fence. Tie a double bow (pro tip: check out this tutorial from FSJ on tying double bows) using Natural Journey Twine. Cut two pieces of Gift Twine, about 5" each and separate the metallic gold threads from the twine. Save the twine for another project, you will only use the gold metallic for this card. Place a Journey Glue Dot on the left side of the fence and lay the two piece of gold metallic thread on the dot. Add the double bow on top of the Journey Glue Dot and gold thread. Embellish the card by tracing the sentiment with Journey Glaze and adhering Rainbow Drops to the front of the card.
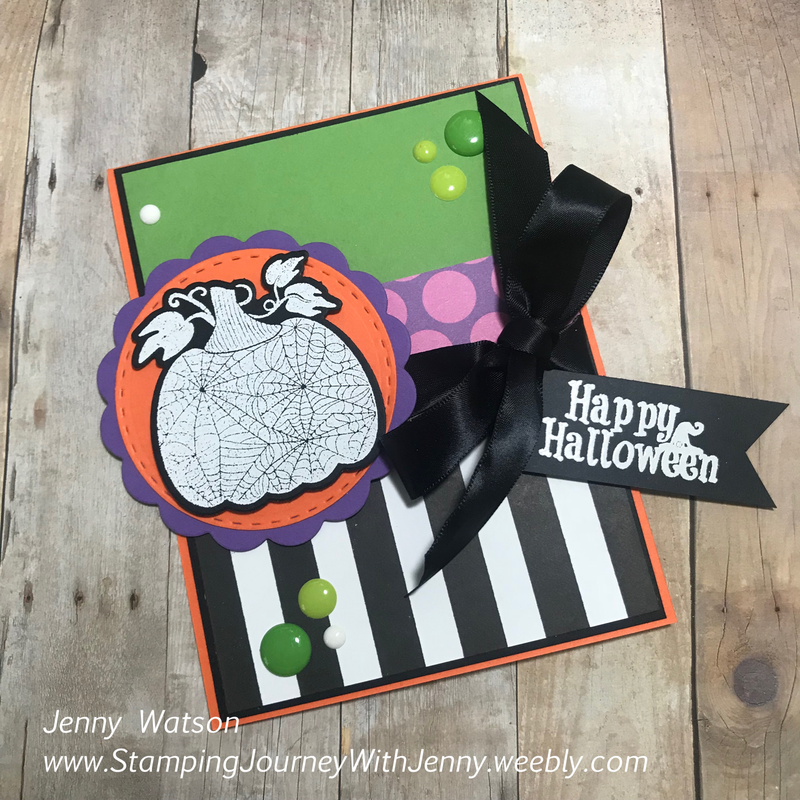
Halloween Card
Supplies
STAMPS, DIES & EMBOSSING FOLDERS
Martha's Pumpkins BD-0426, Striped Wall SS-0180, Annual Celebration SS-0167, Circle Around DI-0466, Journey Scallops DI-0460 PAPER Whip Cream CS-0040, Black Licorice CS-0003, Citrus Cooler CS-0089, Grape Fusion CS-0012, Limeade Splash CS-0020, Fall-O-Ween Prints PP-0060 INK/COLORING Black Licorice IP-0041, Clear Pigment IP-0102, Journey White Embossing Powder IP-0098 EMBELLISHMENTS Black Licorice Satin Ribbon AC-0106, Sweet Candy Drops AC-0275 ADHESIVES Easy Glide Permanent Adhesive Runner AD-0081, Foam Squares AD-0084 & AD-0085, Craft Glue AD-0111, White Liner Tape AD-0001 TOOLS Bloom Tool TO-0073, Journey Blooms Paper Trimmer TO-0039, Details Pro Shears TO-0063, FSJ Platinum 6 TO-0153, Journey Scoring Board TO-0149, Journey Heat Gun TO-0083, Journey Colorless Blender JM-0095, Journey Sofft Tools JM-0098, Media Tray TO-0122 Measurements
Citrus Cooler Card Stock
- card base 4-1/4" x 11" - piece to die cut circle 3" x 3" Whip Cream Card Stock - front panel 4" x 5-1/4" Limeade Splash Card Stock - front panel 4" x 2-1/2" Black Licorice Card Stock - layered panel 4-1/8" x 5-3/8" - piece to emboss and die cut pumpkin 3" x 3" - piece for sentiment 1" x 3" Grape Fusion Card Stock - piece to die cut scallop circle 3-1/2" x 3-1/2" Polka Dot Fall-O-Ween Print - front strip 1-1/2" x 4" Instructions
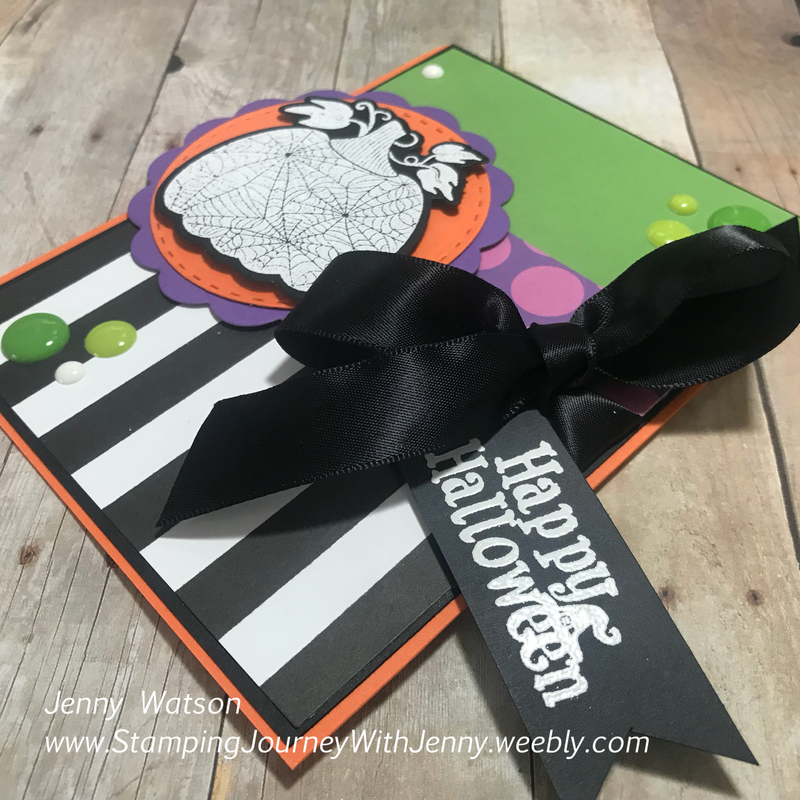
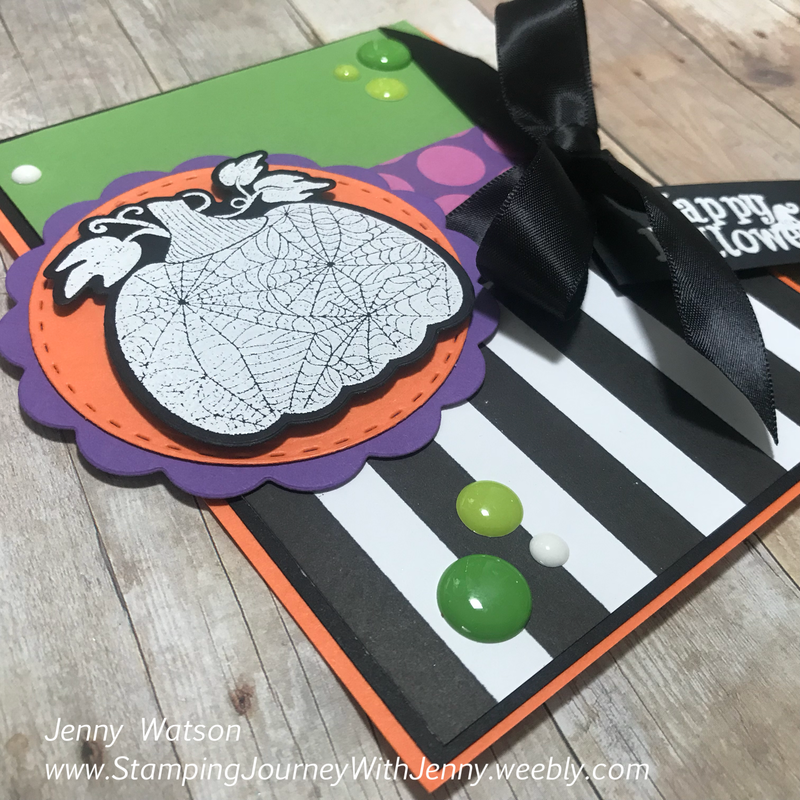
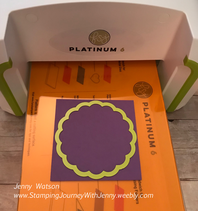
I love the different patterns and colors in this Halloween card. The polka dots and stripes give a fun, whimsical look. This card is no tricks and all treats! Begin by using Journey Sofft Tools to apply Journey Colorless Blender to the 3" x 3" and 1" x 3" Black Licorice card stock. This will remove static and ensure the embossing powder only sticks where you have stamped the image. Stamp the spider web pumpkin and 'Happy Halloween' sentiment in Clear Pigment ink on Black Licorice card stock and cover in Journey White embossing powder. Activate the embossing powder by heating with your Journey Heat Gun. Using your FSJ Platinum 6, die cut the pumpkin using the coordinating die. Die cut the 3" x 3" Tangerine Fusion card stock using the third largest circle from the Circle Around die set. Once the circle is cut, run it through again to add the stitching from the third largest stitched die, also from the Circle Around die set. While you can run the full circle and stitched circle through at the same time, I prefer to run one at a time to ensure I have my stitching lined up well on the circle so it is even. Die cut the 3-1/2" x 3-1/2" Grape Fusion card stock using the third largest scallop circle from the Journey Scallops die set.
Next, stamp the Whip Cream card stock using the Striped Wall stamp and Black Licorice ink. You want the image to be very crisp and dark so use a well inked stamp pad and make sure the stamp has plenty of ink coverage before stamping it on the Whip Cream card stock. Adhere the Black Licorice card stock panel to the Tangerine Fusion card base. Adhere the Limeade Splash card stock to the top half of the Striped Wall stamped Whip Cream panel. Cover where the Limeade Splash ends on the Whip Cream with your strip of Grape Fusion polka dot printed paper. Tie a bow of Black Licorice Satin Ribbon around the Whip Cream panel, just under the polka dot strip. Adhere the Whip Cream panel to the Black Licorice panel. Adhere the Tangerine Fusion die cut circle to the Grape Fusion die cut scallop circle. Using Journey Foam Squares, attach the embossed pumpkin die cut to the Tangerine Fusion circle. Adhere the Grape Fusion scallop circle to the left side of the card, careful not to put adhesive to the side of the scallop circle that hangs off the edge of the card. Using your Details Pro Shears, hand cut a banner edge on the right side of the sentiment strip and adhere to the card using Journey Foam Squares. Again, careful not to put adhesive on the edge that hangs off the card edge. Sometimes it adds more interest to your project when you design outside the traditional 4-1/4" x 5-1/2" card front. Finish your card by adding the best embellishment EVER - Sweet Candy Drops. I mean, they're the perfect addition. Always.
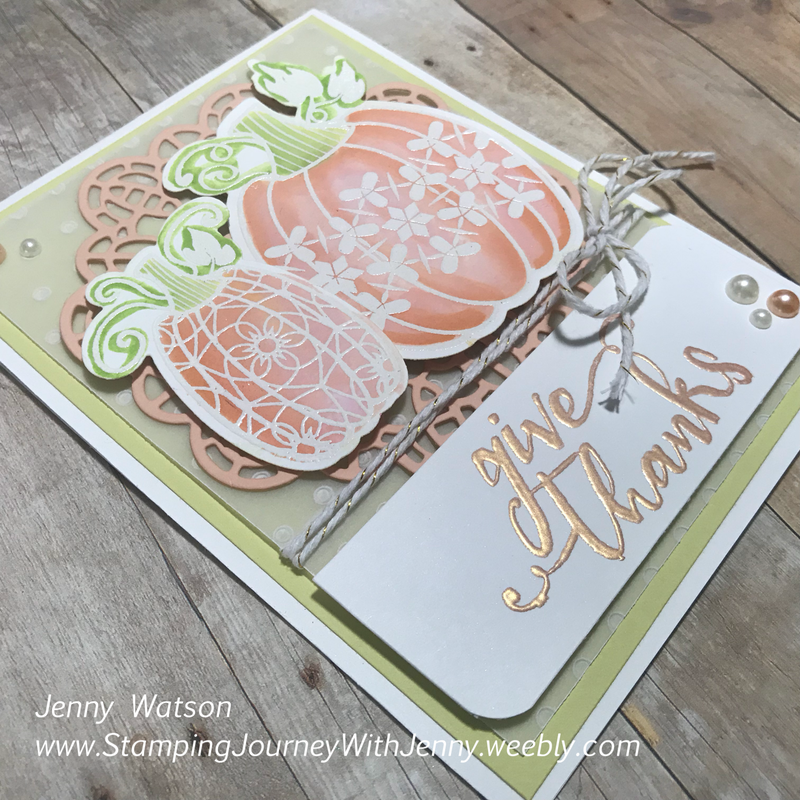
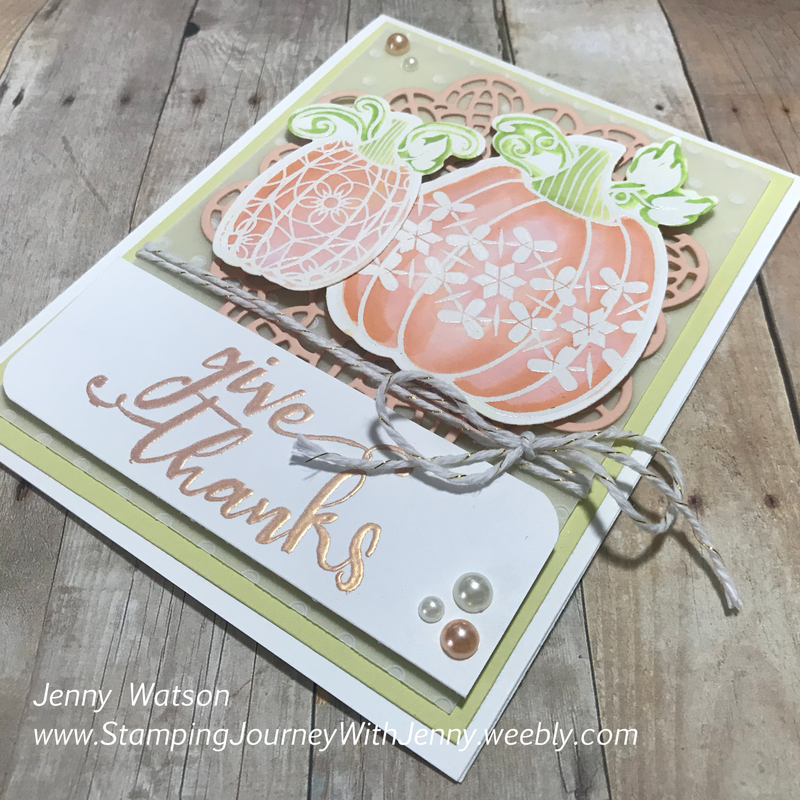
Thanksgiving Card
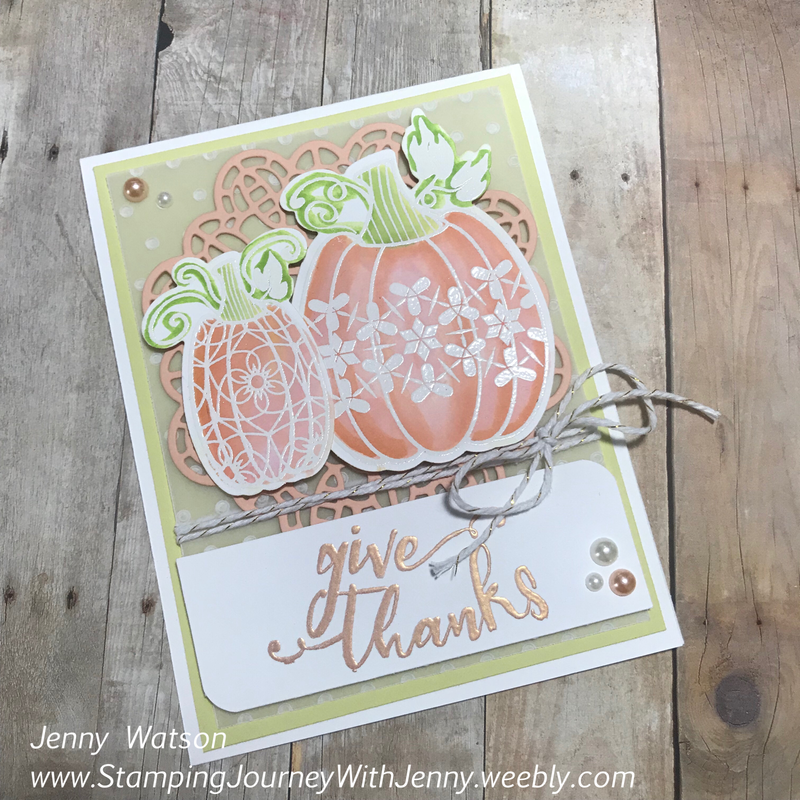
Supplies
STAMPS, DIES & EMBOSSING FOLDERS
Martha's Pumpkins BD-0426, Doily DI-0105, Tiny Dot Embossing Folder EF-0037 (Bloom Benefit), Tom Turkey AT-0296 (Bloom Benefit) PAPER Whip Cream CS-0040, Sweet Pear CS-0095, Peaches and Cream CS-0144, Journey Vellum PP-0044 INK/COLORING Clear Pigment IP-0102, Rose Gold Embossing Powder IP-0147, Journey White Embossing Powder IP-0098, Liquid Colors: Peaches and Cream IP-0155, Sweet Pear IP-0162, Limeade Splash IP-0133, Orange Creamsicle IP-0135 EMBELLISHMENTS Pearls AC-0024, Meadow Pearls AC-0404, Gift Twine AC-0395 ADHESIVES Easy Glide Permanent Adhesive Runner AD-0081, Foam Squares AD-0084 & AD-0085, Craft Glue AD-0111, White Liner Tape AD-0001 TOOLS Bloom Tool TO-0073, Journey Blooms Paper Trimmer TO-0039, Details Pro Shears TO-0063, FSJ Platinum 6 TO-0153, Journey Scoring Board TO-0149, Journey Heat Gun TO-0083, Journey Colorless Blender JM-0095, Journey Sofft Tools JM-0098, Small Journey Blending Brush TO-0097, Medium Journey Blending Brush TO-0098, Media Tray TO-0122, Bloom Palette TO-0151, Journey Corner Rounder TO-0150 Measurements
Whip Cream Card Stock
- card base 4-1/4" x 11" - piece to stamp and die cut pumpkins 3-1/2" x 5-1/2" - strip for sentiment 1-3/8" x 3-3/4" Sweet Pear Card Stock - front panel 4" x 5-1/4" Journey Vellum - front panel 3-3/4" x 5" Peaches and Cream Card Stock - piece to die cut doily 4-1/2" x 4-1/2" Instructions
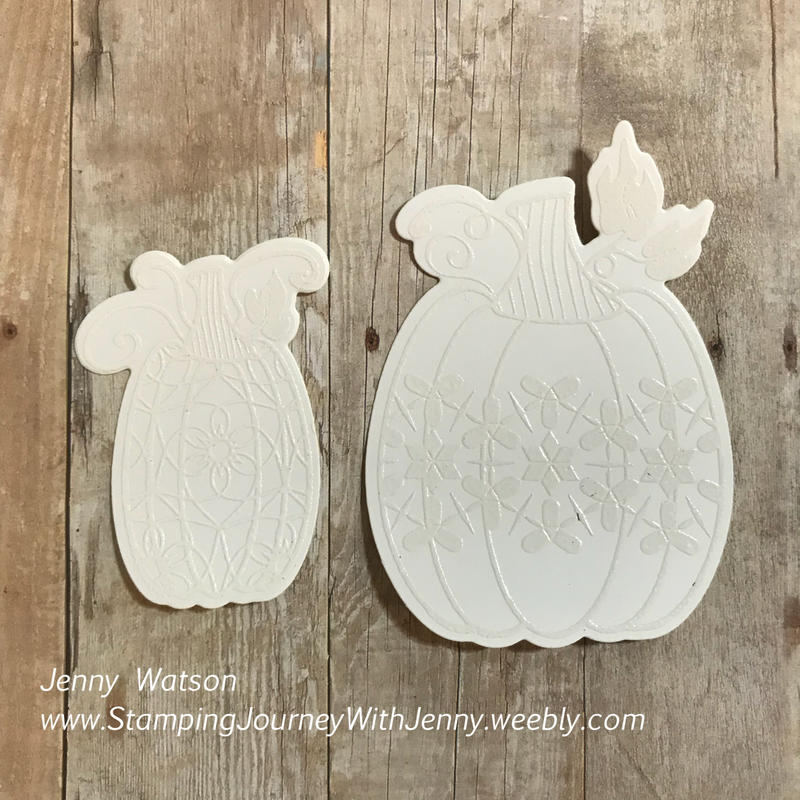
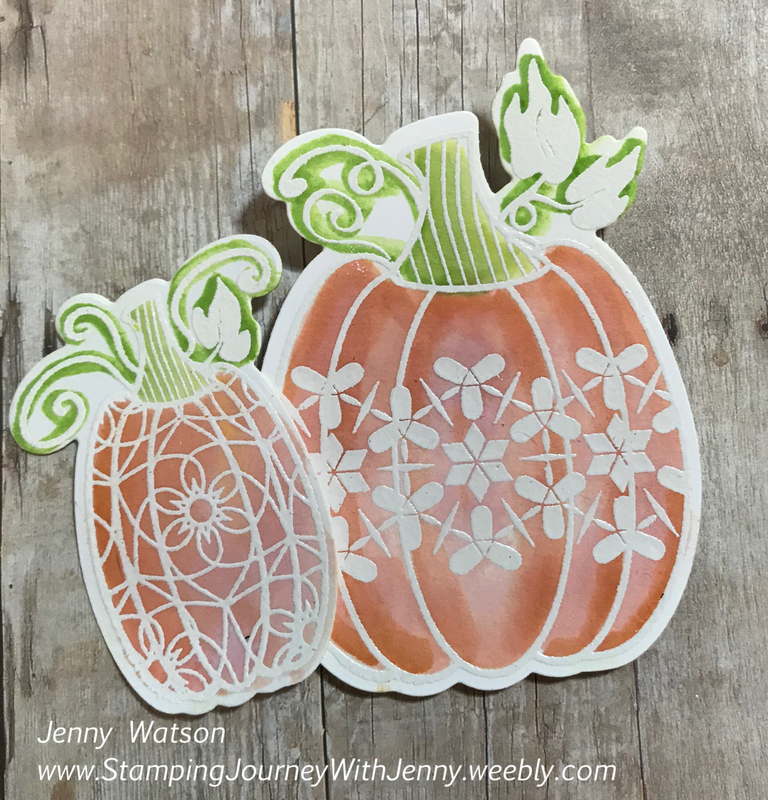
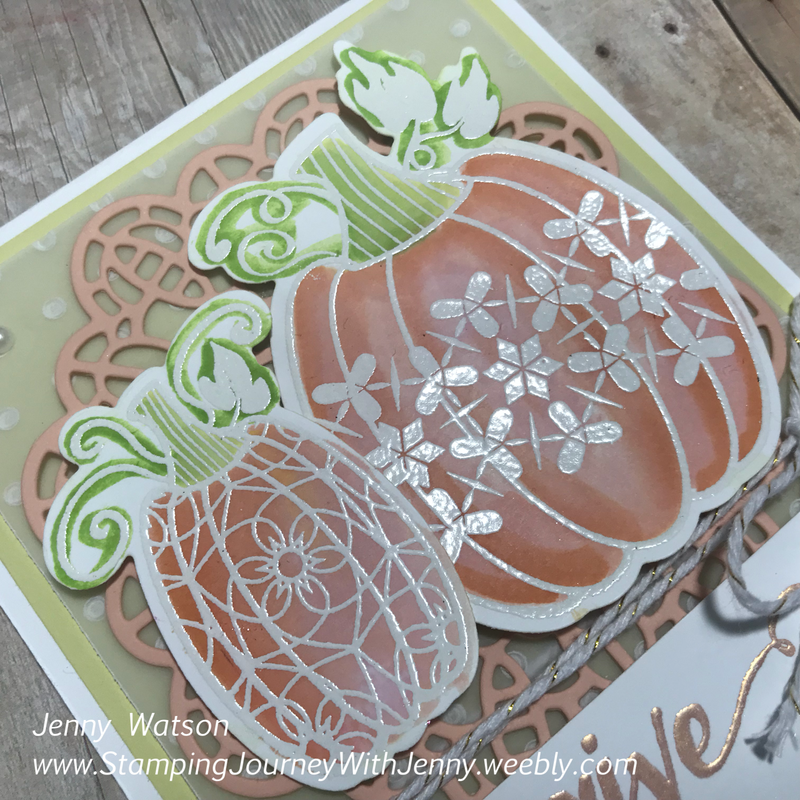
While I love rich, deep colors for fall cards the Rose Gold embossing powder was calling to me and I absolutely love how this Thanksgiving card turned out with the light, almost pastel colors. Sweet Pear is a color I haven't utilized as much as I should. I have recently fallen in love with this color, it's really a very beautiful yellow-green that pairs well with many of FSJ's other colors. To create this card, begin by using Journey Sofft Tools to apply Journey Colorless Blender to the 3-1/2" x 5-1/2" and 1-3/8" x 3-3/4" Whip Cream card stock. Stamp the largest pumpkin and tall, slender pumpkin in Clear Pigment ink and cover with Journey White embossing powder. Stamp the 'Give Thanks' sentiment in Clear Pigment ink and cover with Rose Gold embossing powder. Heat with the Journey Heat Gun to set the embossing powder. Die cut the Peaches and Cream card stock using the Doily die - the Bloom Tool comes in handy to remove the pieces from the die. With intricate dies, such as the Doily die, I run it through my machine, turn it over so the cut side is up, turn it 90° and run it through again. This ensures you have nice, full cuts in your card stock. Using the Tiny Dots embossing folder, emboss the Journey Vellum with the FSJ Platinum 6. Die cut the embossed pumpkins using your FSJ Platinum 6 and matching die set.
Add the Peaches and Cream, Sweet Pear, Limeade Splash and Orange Creamsicle Liquid Colors to the Bloom Palette to begin watercoloring the pumpkin images using the Journey Blending Brushes. I went over the whole pumpkin in Peaches and Cream, then shaded using Orange Creamsicle. I did the same thing with the stems - Sweet Pear everywhere, then shade with Limeade Splash. For the leaves and tendrils I colored around them since they are solid images with white embossing powder. Watercoloring is a fun, relaxed way to color. Don't stress if color blends or goes outside the lines, that's how it should look!
Adhere the Sweet Pear panel to the Whip Cream card base. Adhere the Doily die cut to the Tiny Dot embossed Journey Vellum - I made the debossed side of the dots the front of the card. Wrap Gift Twine twice around the Journey Vellum and tie a bow on the right side. Use the Journey Corner Rounder punch on the top right and bottom left corners of the sentiment strip and adhere to the vellum using Journey Foam Squares. Adhere the Journey Vellum to the Sweet Pear, only adding adhesive where it will be covered by the sentiment and doily so it does not show through the vellum. Adhere the pumpkins to the doily using Journey Foam Squares. Embellish the card with Journey Pearls and Meadow Pearls.
I hope you were inspired by my Martha's Pumpkins trio of cards. If you have any questions please don't hesitate to post in comments or contact me.
Next stop on the FSJ Creative Team Blog Hop is Marty McGee. You will love her celestial Halloween collection - do not miss this post! Enjoy the rest of the FSJ Creative Team Blog Hop! Kazan Clark Lezlye Lauterbach Carrie Rhoades Christine Chan Jill Hilliard Jenny Watson (you are here) Marty McGee Alissa Hall Live a creative life, Jenny Watson FSJ Coach 233
25 Comments
9/15/2018 08:21:29 am
Jenny, I am loving your Martha's Pumpkins cards. I love how you can go from the bright colors of halloween to the soft colors and rose gold with this stamp set! Beautiful cards!
Jenny Watson
9/15/2018 01:30:34 pm
Thank you so much Carrie!
Liz Smith
9/15/2018 09:56:47 am
I love this stp set! Thanks for the great ideaa!
Jenny Watson
9/15/2018 01:31:01 pm
Glad you enjoyed them!
Teri Ives
9/15/2018 10:18:09 am
Wow, nice thanks for sharing
Jenny Watson
9/15/2018 01:31:26 pm
My pleasure, thank you!!
Patricia Dolinsek
9/15/2018 11:47:55 am
Your cards are so lovely. I especially like the one where you layered the pumpkins with different colors to achieve your desired look & add dimension at the same time.
Jenny Watson
9/15/2018 01:32:02 pm
Thanks! It was a fun technique to use on this set. 9/15/2018 01:14:35 pm
What a lovely set! Especially the last one, the beauty of the rose gold embossing powder 😍😍😍😍 I have to case the last one. Beautifully done ! Love
Jenny Watson
9/15/2018 01:32:29 pm
Thank you! Love that Rose Gold ;)
Shannon
9/15/2018 03:37:41 pm
Love the different looks you got from the same stamp set. Great projects!
Jenny Watson
9/16/2018 01:38:03 pm
Thanks! It was fun to create multiple looks using the same set. 9/15/2018 04:51:11 pm
Lovely cards Jenny! I especially love the last one the soft tones are fabulous! I can't wait for my Martha's Pumpkins set to arrive.
Jenny Watson
9/16/2018 01:38:32 pm
I can't wait to see what you create!
kazan
9/15/2018 06:55:28 pm
one of my favorite sets that you worked your magic on . Love the cards
Jenny Watson
9/16/2018 01:38:57 pm
That's quite the compliment, thank you!!
Jenny Watson
9/16/2018 01:53:18 pm
Love your cards too!! #stampingtwins
Christine Pennington
9/18/2018 01:10:34 am
Bravo. My favorite is the last. It must have taken you hours to write this post? Mind blow.
Jenny Watson
9/23/2018 08:54:57 pm
Thank you! <3
Cheryl Shoats
9/19/2018 01:38:15 pm
Thanks so much for sharing Jenny!! Love the cards
Jenny Watson
9/23/2018 08:55:26 pm
Thank you so much!
Katy Hoyt
9/23/2018 09:37:20 pm
Gorgeous
Jenny Watson
9/24/2018 11:03:41 am
Thank you <3
Joyce Bergthold
10/15/2018 11:42:02 am
I love the versatility of this stamp set, and you showed how easy it is to go from one to another. Your work is awesome. Thank you for sharing! Leave a Reply. |

Jenny Watson, FSJ Coach 233I have been stamping for 15 years and am thrilled to be one of the first Fun Stampers Journey Coaches in Ohio. I am currently one of eight members on the FSJ Creative Team for 2018-2019. It was my honor to serve on the 2016-2017 Leadership Team for Fun Stampers Journey. 

Archives
October 2018
|


 RSS Feed
